Reviewed by Dr. Harrison Scofield -Sports Medicine Physician
Harrison Scofield, MD | Sports Medicine Surgeon in San Antonio (tsaog.com)
Athletes push their bodies to the limit, and the risk of injury comes with that drive. Specific sports injuries tend to occur more frequently due to the repetitive motions or high-impact nature of particular activities. From minor strains to severe ligament tears, these injuries can disrupt an athlete’s progress and even sideline them for extended periods of time. In this blog, we explore some of the most common sports injuries every athlete should be aware of and provide tips on prevention, treatment, and recovery.
1. Patellofemoral Syndrome
Patellofemoral syndrome, commonly known as “runner’s knee,” is one of the most prevalent sports injuries, particularly among runners, cyclists, and athletes who engage in repetitive knee movements. The condition can have multiple causes including misalignment of the kneecap as it moves over the femur, leading to pain and discomfort at the front of the knee. Athletes experiencing patellofemoral syndrome may feel pain during activities like squatting, running, or walking upstairs.
Strengthen the muscles around the knee, particularly the vastus medialis portion of the quadriceps muscle (VMO Exercises), to prevent and treat patellofemoral syndrome. If you are experiencing runner’s knee, physical therapy is an excellent option for learning strengthening exercises to address the pain, recover, and prevent it from occurring again. This can usually be treated successfully with physical therapy, anti-inflammatory medications and activity modification and often does not require surgery.
2. Concussion
Concussions are a common and severe injury in contact sports such as football, rugby, and soccer. A concussion occurs when a blow to the head causes the brain to move rapidly inside the skull, leading to temporary loss of brain function. Symptoms of a concussion can range from mild to severe, including headaches, dizziness, confusion, and memory problems.
According to the American Academy of Neurology’s new guidelines for concussions, an athlete with a possible concussion should be taken out of the game and assessed by a licensed healthcare professional trained in concussions. The new guidelines recommend that return-to-play be evaluated on a case-by-case basis, happen slowly, and only after all acute symptoms are gone. An athlete should refrain from returning to contact sports for at least one week following a concussion and should follow a graduated return to play protocol lead by an athletic training or other medical provider.
3. Plantar Fasciitis
Plantar fasciitis affects the bottom of the foot, causing stabbing pain in the heel or arch, especially in the morning or after periods of rest. This injury is common in runners, dancers, and athletes who spend a lot of time on their feet. It’s caused by inflammation of the plantar fascia, a thick band of tissue that supports the foot of the arch.
The mainstay of treatment is stretch the calves as a tight heel cord is typically the cause of this issue. This should be done multiple times a day to help improve symptoms. Orthotic inserts are also often helpful. You can ice and stretch the plantar fascia at the same time by freezing a water bottle and using this to roll over the bottom of the foot.
4. Shin Splints
Shin splints, or medial tibial stress syndrome, refer to pain along the shin bone. This injury is common among runners and athletes who suddenly increase their training intensity or switch to more complex surfaces. The pain is caused by inflammation of the muscles, tendons, and bone tissue around the shin.
Gradually increasing training intensity, using proper running shoes, and practicing good form can help prevent shin splints. Strength training, rest, and ice are essential for recovery, and athletes may need to cross-train with low-impact activities while healing.
5. ACL Tear
An ACL (anterior cruciate ligament) tear is one of the most severe and feared sports injuries. It occurs when the ACL, a ligament in the knee, is overstretched or torn, often during sudden changes in direction, awkward landings, or direct collisions. Sports like basketball, soccer, and skiing have a high rate of ACL injuries, which usually require surgery or months of rehabilitation.
Strengthening the muscles around the knee and practicing proper landing techniques can reduce the risk of an ACL tear. Many athletes benefit from training programs to improve balance, agility, and knee stability. Specifically, Nordic hamstring curls have been shown to help prevent ACL tears: Nordic Hamstring Curl
To learn more about ACL injuries, read our blog ACL Injuries and Tears 101: Your Guide to Treatments & Prevention Methods.
6. Hamstring Strain
Hamstring strains happen when the muscles at the back of the thigh are overstretched or torn. This injury is common in sports that require sprinting, such as track, football, and soccer. A hamstring strain can range from a minor pull to a complete tear, significantly impacting an athlete’s ability to run, jump, or even walk.
Regular strength training, warm-up exercises, and stretching the hamstrings and glutes can help prevent strains. Athletes should avoid sudden increases in speed or intensity during training to minimize the risk. These injuries can almost always be treated without surgery but recurrence of the injury is common if proper rehabilitation is not performed. Occasionally, the hamstring tendons can tear completely requiring surgery.
7. Tennis or Golf Elbow
Tennis elbow (lateral epicondylitis) and golf elbow (medial epicondylitis) are overuse injuries that cause pain around the elbow joint. They are common among athletes who engage in repetitive wrist and arm movements, such as tennis players, golfers, and even weightlifters.
Strengthening the muscles in the forearm and using proper techniques when swinging can help prevent these injuries. Rest, ice, anti-inflammatory medications, bracing and progressive exercises are typically recommended for treatment. These can usually be treated without surgery
8. Rotator Cuff Tear
The rotator cuff consists of four muscles and tendons that stabilize the shoulder joint. Tears can be caused by repetitive overhead motions, commonly seen in sports like baseball, tennis, and swimming. A rotator cuff tear can cause pain and weakness in the shoulder, making it difficult for athletes to lift or rotate their arms. These become much more common in athletes over 40 years old and are much less common in young athletes.
Strengthening the shoulder muscles and avoiding overuse can help protect the rotator cuff. To keep the joint strong, athletes should focus on shoulder flexibility and mobility exercises. High repetition band strengthening focusing on the rotator cuff is often the best form of rehabilitation and strengthening: Rotator Cuff Band Exercises
9. Labrum Tear
A labral tear happens when the cartilage surrounding the shoulder or hip socket is damaged, which can be caused by trauma or repetitive motion. The labrum is often torn when a shoulder dislocation occurs. Labrum tears are common in contact sports like football and hockey or in sports requiring powerful rotational movements like baseball.
Strengthening the surrounding muscles and practicing proper form can reduce the risk of labrum tears. Repeat shoulder dislocation is much more common if you dislocate at a younger age and if you play contact sports. Surgery may sometimes be required to repair the tear and restore full function and reduce the chance for any repeat dislocation.
10. Sciatica
Sciatica occurs when the sciatic nerve, a nerve that runs from the lower back down the legs, is compressed or irritated. The condition can cause pain, tingling, or numbness down one leg and is often exacerbated by activities like heavy lifting, running, or prolonged sitting.
Core strengthening exercises, proper posture, chiropractic care, and regular stretching can help prevent sciatica. Physical therapy is often effective for managing symptoms and improving flexibility.
Overcome Sports Injuries at TSAOG
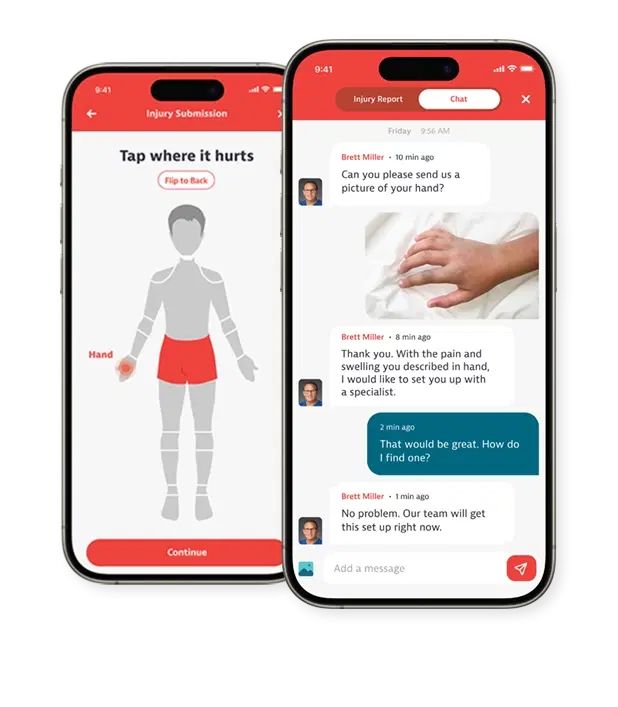
While sports injuries are common, many can be prevented with the proper training, conditioning, and recovery strategies. If you’re an athlete experiencing these injuries, seeking prompt medical attention is critical to a swift recovery. Book an appointment with one of our sports medicine specialists to get back on your feet and into the game.